Nginx Nginx (发音同engine x)是异步框架的网页服务器,也可以用作反向代理 、负载平衡器 和 HTTP 缓存。该软件由伊戈尔·赛索耶夫 创建并于2004年首次公开发布。2011年成立同名公司以提供支持。2019年3月11日,Nginx 公司被 F5 Networks 以6.7亿美元收购。
Nginx 是免费的开源软件,根据类 BSD 许可证的条款发布。一大部分 Web 服务器使用 Nginx ,通常作为负载均衡器。Nginx 可以部署在网络上使用 FastCGI 脚本 、SCGI 处理程序 、WSGI 应用服务器 或 Phusion Passenger 模块的动态 HTTP 内容 ,并可作为软件负载均衡器。
Nginx 使用异步事件驱动的方法来处理请求。Nginx 的模块化事件驱动架构可以在高负载下提供更可预测的性能。
Nginx 是一款面向性能设计的HTTP服务器,相较于 Apache 、lighttpd 具有占有内存少 ,稳定性高 等优势。与旧版本(<=2.2)的 Apache 不同,Nginx 不采用每客户机一线程的设计模型,而是充分使用异步逻辑从而削减了上下文调度开销,所以并发服务能力更强。整体采用模块化设计,有丰富的模块库和第三方模块库,配置灵活。 在 Linux 操作系统下,Nginx 使用 epoll 事件模型,得益于此,Nginx 在 Linux 操作系统下效率相当高。同时 Nginx 在 OpenBSD 或 FreeBSD 操作系统上采用类似于 epoll 的高效事件模型 kqueue 。
根据 Netcraft 在2016年11月网络服务器调查,Nginx 被发现是所有“活跃”站点(被调查站点的18.22%)和百万最繁忙站点(被调查站点的27.83%)中使用次数最多的Web服务器。根据 W3Techs 的数据,前100万个网站中的37.7%,前10万个网站中的49.7%,以及前10000个网站中的57.0%被使用。 据 BuiltWith 统计,在全球前10000个网站中,有38.2%的网站使用 Nginx 。 维基百科使用 Nginx 作为其 SSL 终端代理。 从 OpenBSD 5.2 版本(2012年11月1日)开始,Nginx 成为了 OpenBSD 基础系统的一部分,提供了替代 Apache 1.3 系统的替代方案, 但是后来被替换为 OpenBSD 自己的 httpd(8) 。(来自维基百科 )
安装 第一步:安装 Homebrew 打开终端输入一下命令
1 /usr/bin/ruby -e "$(curl -fsSL https://raw.githubusercontent.com/Homebrew/install/master/install)"
关于 homebrew 的介绍看这里
第二步安装 Nginx 使用 homebrew 安装
查看版本号 注意:
brew安装的文件路径一般默认在
/usr/local/Cellar/nginx/
nginx的真正路径在:
/usr/local/etc/nginx
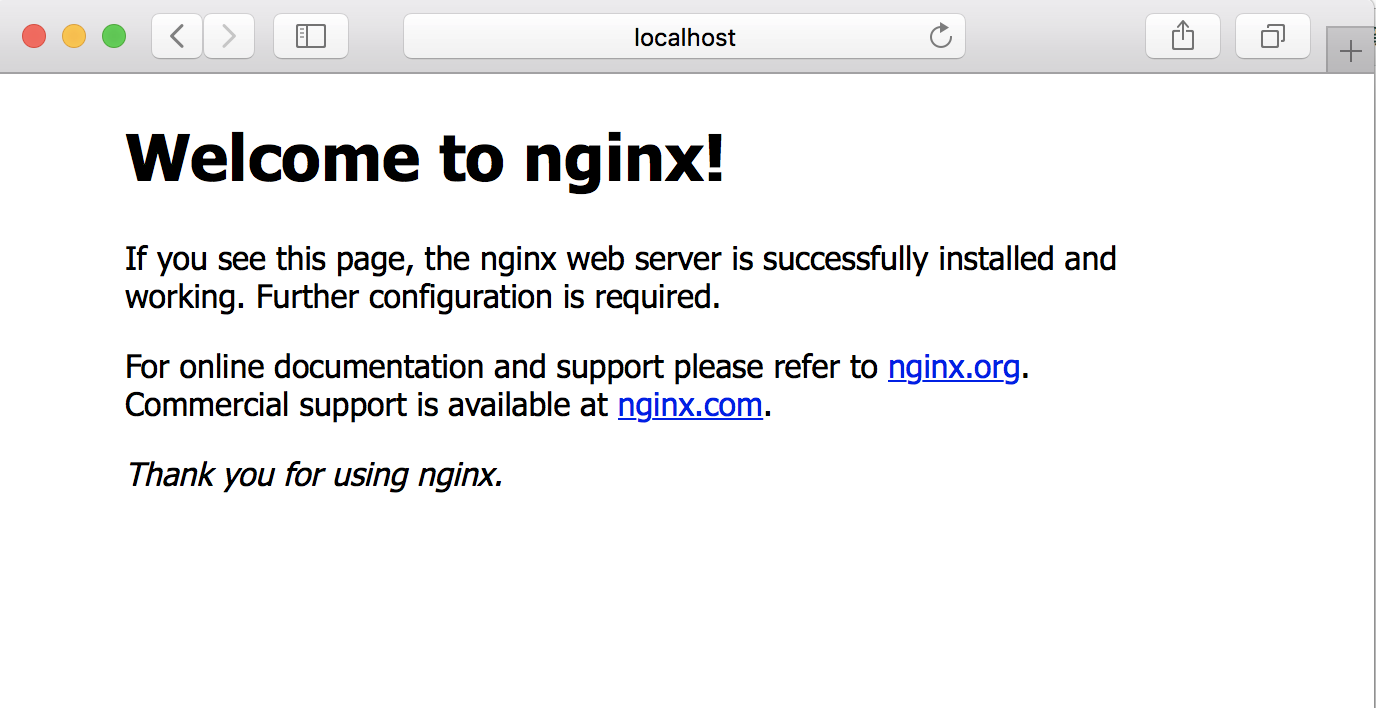
启动 打开浏览器输入http://localhost:8080
其他常用指令1 2 停止 sudo nginx -s stop 重启 sudo nginx -s reload
##常用配置
核心配置文件 nginx.conf 1 位置 /usr/local/etc/nginx/nginx.conf
nginx 配置文件主要分为六个区域:
main(全局设置)
events(nginx工作模式)
http(http设置)
sever(主机设置)
location(URL匹配)
upstream(负载均衡服务器设置)。
nginx.conf 常用配置
1 2 3 4 5 6 7 8 9 10 server { listen 8080; #端口配置 server_name localhost; #域名配置 #charset koi8-r; #access_log logs/host.access.log main; ······ }
1 2 3 4 location / { root html; index index.html index.htm; }
location /表示匹配访问根目录。
1 路径 /usr/local/Cellar/nginx/[version]/html
这里的html文件夹实际上是一个替身(快捷方式),实际的默认文件位置是在
1 默认文件路径 /usr/local/var/www
1 2 3 4 5 6 7 listen:表示当前的代理服务器监听的端口,默认的是监听80端口。注意,如果我们配置了多个server,这个listen要配置不一样,不然就不能确定转到哪里去了。 server_name:表示监听到之后需要转到哪里去,这时我们直接转到本地,这时是直接到nginx文件夹内。 location:表示匹配的路径,这时配置了/表示所有请求都被匹配到这里 root:里面配置了root这时表示当匹配这个请求的路径时,将会在这个文件夹内寻找相应的文件,这里对我们之后的静态文件伺服很有用。
#配置 Tomcat
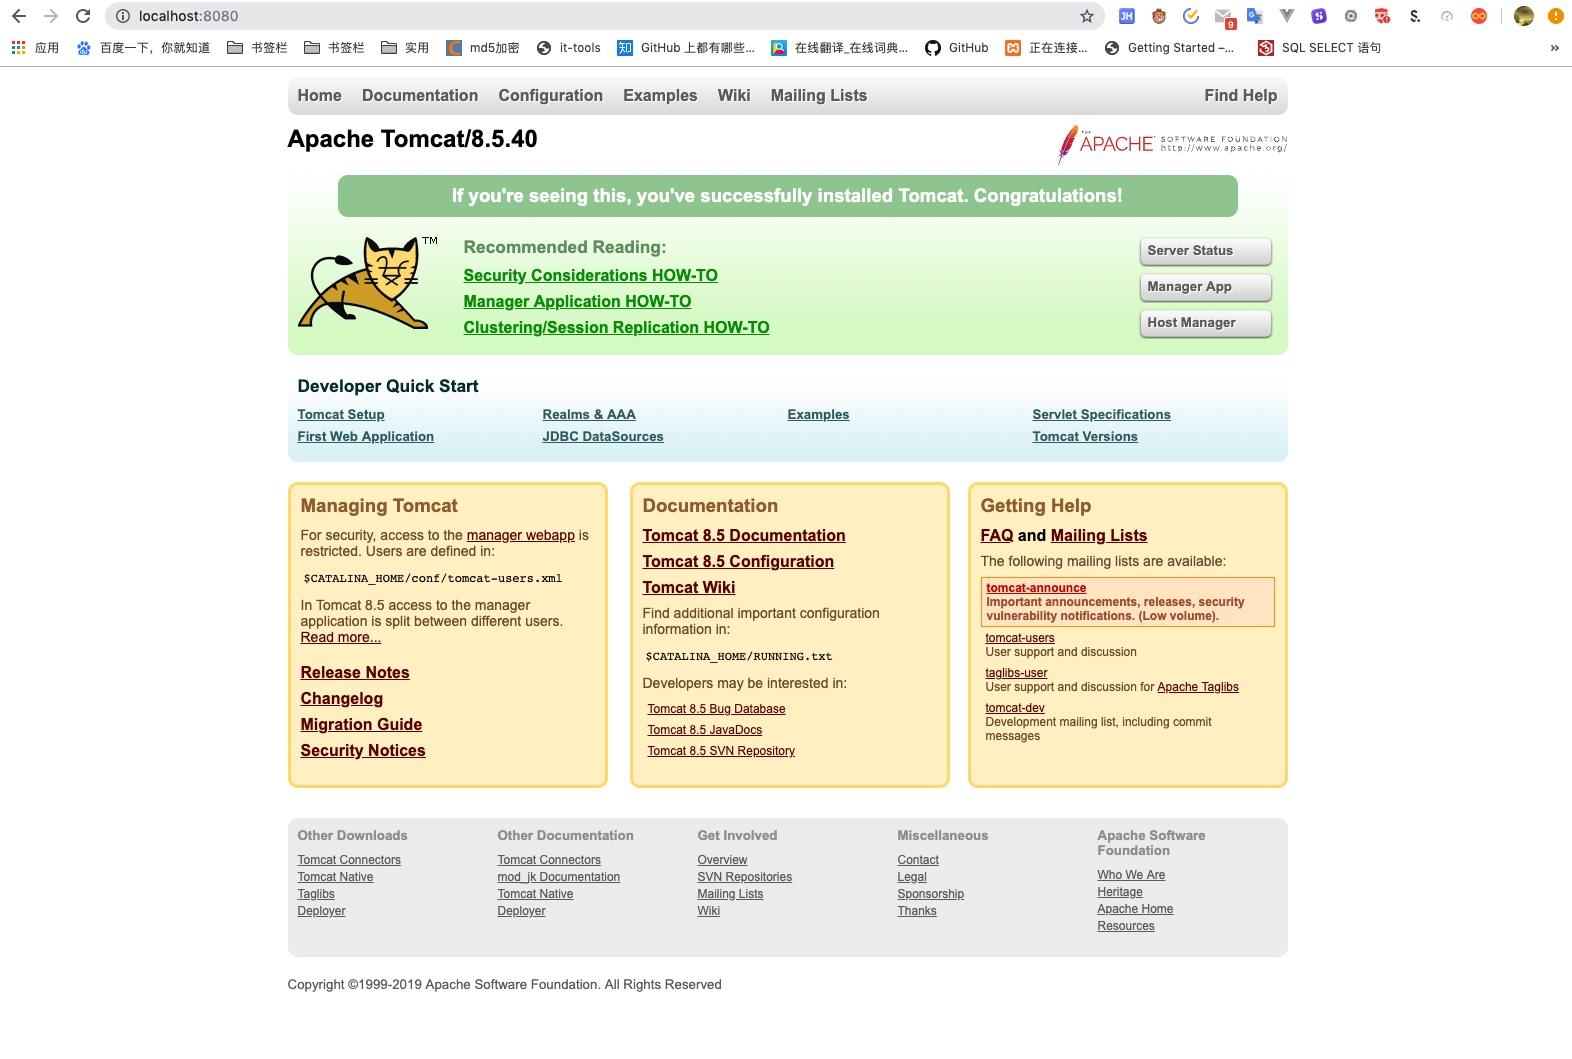
proxy_pass 配置请求转发地址。即当访问 localhost 的 8080 端口时,请求会跳转至 localhost 的 8180 端口处。修改完 Nginx 的配置后不需要重启 Nginx ,输入上面的重启命令即可。
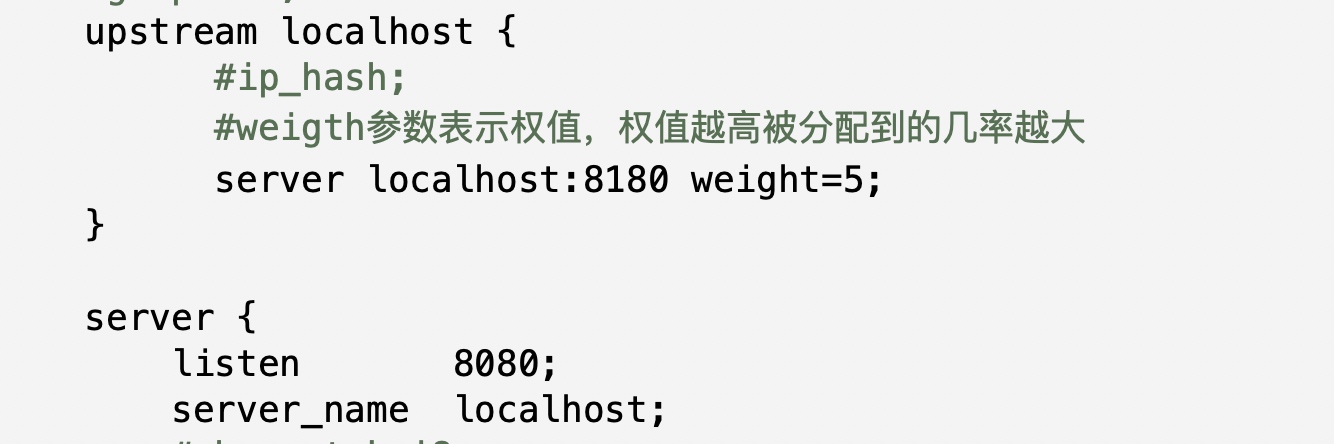
负载均衡配置 当一台服务器出现故障后,我们需要将请求自动转向另一台服务器,此种需求该如何配置呢?利用Nginx 也是比较方便能够实现,具体配置如下:
注意,上面还加上了一个weight属性,此属性表示各服务器被访问到的权重,weight越高访问到的几率越高。
配置后访问 localhost:8080,跳转到 tomcat 的启动页:
其他配置
配置示例 1、配置 HTTP 服务(80端口)
1 2 3 4 5 6 7 8 9 10 11 12 13 14 15 16 17 18 19 20 21 22 23 24 25 26 27 28 29 30 31 32 33 34 35 36 37 38 39 40 41 42 43 44 45 46 47 48 49 50 51 52 53 54 55 56 57 58 59 60 61 62 63 64 65 66 67 68 69 70 71 72 73 74 75 76 77 78 79 80 81 82 83 # Virtual Host configuration for arlingbc.com # # You can move that to a different file under sites-available/ and symlink that # to sites-enabled/ to enable it. # # 丢弃缺乏 Host 头的请求 server { listen 80; return 444; } server { listen 80; listen [::]:80; server_name example.com www.example.com; # 定义服务器的默认网站根目录位置 root /var/www/example/; # Add index.php to the list if you are using PHP index index.html index.htm index.nginx-debian.html; # access log file 访问日志 access_log logs/nginx.access.log main; # 禁止访问隐藏文件 # Deny all attempts to access hidden files such as .htaccess, .htpasswd, .DS_Store (Mac). location ~ /\. { deny all; access_log off; log_not_found off; } # 默认请求 location / { # 首先尝试将请求作为文件提供,然后作为目录,然后回退到显示 404。 # try_files 指令将会按照给定它的参数列出顺序进行尝试,第一个被匹配的将会被使用。 # try_files $uri $uri/ =404; try_files $uri $uri/ /index.php?path_info=$uri&$args =404; access_log off; expires max; } # 静态文件,nginx 自己处理 location ~ ^/(images|javascript|js|css|flash|media|static)/ { #过期 30 天,静态文件不怎么更新,过期可以设大一点, #如果频繁更新,则可以设置得小一点。 expires 30d; } # .php 请求 location ~ \.php$ { try_files $uri =404; include /etc/nginx/fastcgi_params; fastcgi_pass unix:/var/run/php5-fpm.sock; fastcgi_index index.php; fastcgi_param SCRIPT_FILENAME $document_root$fastcgi_script_name; fastcgi_intercept_errors on; } # PHP 脚本请求全部转发到 FastCGI 处理. 使用 FastCGI 默认配置. # pass the PHP scripts to FastCGI server listening on 127.0.0.1:9000 # #location ~ \.php$ { # include snippets/fastcgi-php.conf; # # # With php7.0-cgi alone: # fastcgi_pass 127.0.0.1:9000; # # With php7.0-fpm: # fastcgi_pass unix:/run/php/php7.0-fpm.sock; #} # 拒绝访问. htaccess 文件,如果 Apache 的文档根与 nginx 的一致 # deny access to .htaccess files, if Apache's document root # concurs with nginx's one # #location ~ /\.ht { # deny all; #} }
2、配置 HTTPS 服务(443端口)
1 2 3 4 5 6 7 8 9 10 11 12 13 14 15 16 17 18 19 20 21 22 23 24 25 26 27 28 29 30 31 32 33 34 35 36 37 38 39 40 41 42 43 44 45 46 47 48 ## # 443 port ## server { ## # 阿里云参考配置 ## listen 443; listen [::]:443; server_name example.com www.example.com; root /var/www/example/; # 为虚拟服务器指明文档的根目录 index index.html index.htm; # 给定URL文件 ## # 部署 HTTP 严格传输安全(HSTS) ## add_header Strict-Transport-Security "max-age=31536000; includeSubDomains; preload;" # Note: You should disable gzip for SSL traffic. # See: https://bugs.debian.org/773332 gzip off; ## # SSL configuration ## ssl on; ssl_certificate cert/certfile.pem; # 证书 ssl_certificate_key cert/certfile.key; # 私钥 ssl_session_timeout 5m; # 设置超时时间 # 密码套件配置 # 密码套件名称构成:密钥交换-身份验证-加密算法(算法-强度-模式)-MAC或PRF ssl_ciphers ECDHE-RSA-AES128-GCM- SHA256:ECDHE:ECDH:AES:HIGH:!NULL:!aNULL:!MD5:!ADH:!RC4; ssl_protocols TLSv1.2; # 设置 SSL/TSL 协议版本号 ssl_prefer_server_ciphers on; # 控制密码套件优先级,让服务器选择要使用的算法套件 ssl_buffer_size 1400; # 减少TLS缓冲区大小,可以显著减少首字节时间(《HTTPS权威指南》P416) ## # location configuration ## # ... }
参考 https://blog.csdn.net/zzk220106/article/details/72466765 https://www.cnblogs.com/naaoveGIS/p/5478208.html https://www.jianshu.com/p/849343f679aa 配置详解